


Home / Blog Center / Chargers / How to Make Your Own Tiled Kitchen Cabinets: Tips and Tricks
How to Make Your Own Tiled Kitchen Cabinets: Tips and Tricks
24/06/2025 | OtterOasis
Kitchen cabinets are an fundamental portion of the kitchen, where cookware, dishes, different condiments, and more can be shown. Setting them within the kitchen doesn't make the space see cluttered. So how can you make cabinets yourself utilizing tiles?
How to Form Cabinets Yourself Utilizing Tiles:
1. Plan Arranging and Fabric Arrangement
Some time recently beginning to create cabinets with tiles, you to begin with got to conduct point by point plan arranging. Decide the cabinet’s measurements, shape, and required capacities, such as capacity space and drawer situation. Based on the plan, select appropriate sorts and colors of tiles. For kitchen cabinets, it is prescribed to utilize tiles that are waterproof, oil-resistant, and simple to clean, such as coated tiles. Other than tiles, you'll moreover have to be plan cement mortar, tile cement, tile cutters, cabinet outline materials (such as plywood or strong wood sheets), screws, sealant, and essential apparatuses like an electric bore, screwdriver, and level. The arranging stage requires tolerance and consideration to detail to guarantee all estimations and materials are enough arranged, avoiding issues amid afterward development steps.
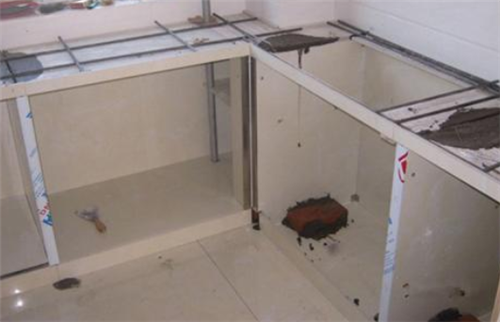
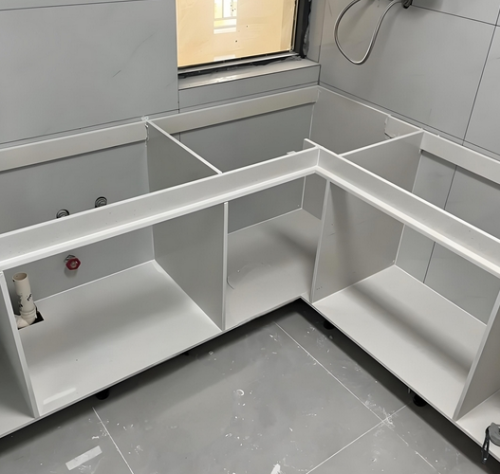
2. Building the Cabinet Outline
The cabinet’s system serves as the establishment and must be strong and strong. Agreeing to the plan measurements, utilize strong wood or plywood to form the cabinet outline. To begin with, cut the sheets into the desired sizes with a saw, at that point settle them together into a box structure utilizing screws or wood stick. Make beyond any doubt the outline is level and steady; utilize a level to check for horizontality and verticality to dodge tilting or precariousness when introducing tiles afterward. Once the outline is completed, you'll be able apply waterproof coating on the surface to upgrade dampness resistance, particularly on parts close the sink and the foot. This step viably expands the cabinet’s life expectancy.
3. Introducing the Tile Base and Tiling
After the outline is built and waterproofed, start laying the tile base. For the most part, cement mortar is utilized as the base layer to guarantee a smooth surface that gives a great establishment for tiling. Once the base layer is dry, apply tile cement and adhere the tiles one by one agreeing to the plan arrange and the pre-cut tile sizes. When tiling, keep indeed holes between each tile for consequent grout filling. Utilize a tile cutter to cut tiles that don't fit suitably to preserve an generally slick appearance. Amid establishment, routinely check the tiles’ levelness and arrangement with a level to maintain a strategic distance from unevenness or misalignment.

4. Grouting and Fixing
After tiling is total, hold up for the cement to dry altogether, ordinarily 24 to 48 hours. At that point carry out grouting by filling the crevices between the tiles with uncommon tile grout to anticipate water entrance and soil collection. Apply the grout equally with steady weight, filling the holes totally, and wipe off overabundance grout with a soggy wipe to keep the joints clean and clean. After grouting, utilize sealant to seal the joints between the cabinet and adjoining surfaces such as dividers and countertops to guarantee great waterproof execution. This step is exceptionally critical for the cabinet’s solidness and ease of cleaning.
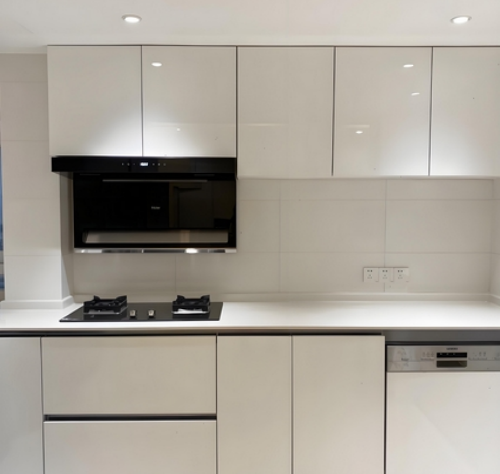
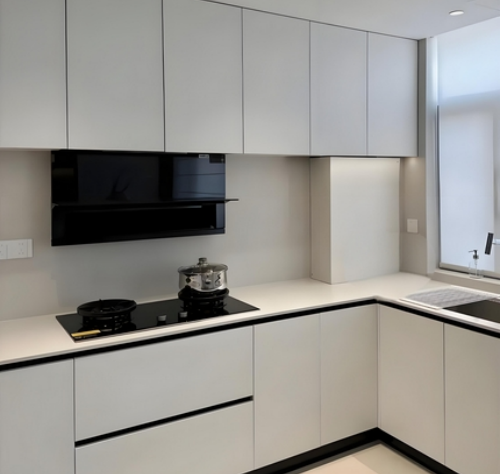
5. Introducing Cabinet Entryways and Equipment
The final step is to introduce the cabinet entryways and different equipment. Select appropriate entryway boards based on the cabinet entryway fabric and plan fashion, such as wooden entryways, glass entryways, or entryways with tile components. Utilize an electric penetrate to introduce pivots and handles, guaranteeing smooth opening and closing. Introduce drawer slides, built-in racks, and drag bushel to improve the cabinet’s convenience. Once all establishments are total, check the generally soundness and usefulness of the cabinet, and clean up any remaining tidy and flotsam and jetsam. At this point, a strong, lovely, and viable kitchen cabinet made with tiles is completed.
In summary:This article presented how to form cabinets yourself utilizing tiles, trusting to be supportive to everybody. For more data, if it's not too much trouble proceed to take after our site.
